
AVXTO Wallet requires an Etherscan API key in order to enable BNB chain access. This is because AVXTO is a thin wallet, not a full node, so we need to load block and transaction data from an indexing service. Etherscan is one of the largest providers of indexing APIs for several chains.
In this article we’ll create an Etherscan API key and configure it in AVXTO Wallet.
Introduction
Etherscan is the most widely used block explorer for the Ethereum network, offering a REST API that lets developers, wallets, and applications query blockchain data programmatically — balances, transaction history, token transfers, gas prices, contract source code, and more. To use this API, you need an API key. This guide walks through why you need one, how to create it, how to configure it securely, and how to use it to power wallet-style functionality.
1. Why You Need an Etherscan API Key
Etherscan’s API is free to use for most endpoints, but it still requires authentication via an API key for several reasons:
- Rate limiting: Keys let Etherscan enforce fair usage limits (typically 5 calls/second and 100,000 calls/day on the free tier) instead of blocking access entirely.
- Abuse prevention: Keys tie usage to an identifiable account, discouraging scraping and denial-of-service behavior.
- Analytics and support: Etherscan can track usage patterns per key, which helps with debugging and support requests.
- Access to premium features: Some advanced endpoints (higher throughput, additional data) are unlocked through paid tiers tied to your key.
Without a valid key, most API requests will fail or return an error indicating a missing or invalid API key.
2. Creating an Etherscan Account and API Key
Step 1: Register an Account
- Go to https://etherscan.io/register.
- Enter a username, email address, and password.
- Verify your email address via the confirmation link Etherscan sends you.
Step 2: Log In and Navigate to the API Keys Page
- Log in at https://etherscan.io/login.
- Click your username in the top-right corner, then select “API Keys” from the dropdown menu (or go directly to https://etherscan.io/myapikey).
Step 3: Generate a New API Key
- Click “+ Add”.
- Give the key an identifiable label (e.g.,
my-wallet-app-prod,portfolio-tracker-dev). Use descriptive names if you plan to create multiple keys for different apps or environments. - Click “Create New API Key”.
- Your key will appear in the table as a long alphanumeric string. Copy it and store it somewhere safe — you will not need to re-generate it unless it’s compromised, but you should avoid pasting it into public places.
Tip: Create separate keys for development and production environments. This makes it easy to revoke or rotate one without affecting the other.
3. Understanding Etherscan’s API Structure
Etherscan’s V2 API unifies access across 50+ supported chains (Ethereum mainnet, testnets, and many EVM-compatible chains like BNB Chain, Polygon, Arbitrum, etc.) through a single endpoint and a single API key, differentiated by a chainid parameter.
Base endpoint:
https://api.etherscan.io/v2/api
A typical request looks like this:
https://api.etherscan.io/v2/api
   ?chainid=1
   &module=account
   &action=balance
   &address=0xYourWalletAddressHere
   &tag=latest
   &apikey=YourApiKeyToken
Key parameters:
chainid— numeric chain ID (1 = Ethereum mainnet, 56 = BNB Chain, 137 = Polygon, etc.)module— API category (account,contract,transaction,stats,gastracker, etc.)action— the specific method within that module (balance,txlist,tokentx, etc.)apikey— your personal API key
4. Configuring the API Key for Wallet Use
If you’re building or configuring a wallet application (or a script to track a wallet) that queries Etherscan, here’s how to wire the key in safely.
Step 1: Store the Key as an Environment Variable
Never hardcode your API key directly into source code, especially if that code will be committed to a public repository. Instead, use an environment variable.
On macOS/Linux:
export ETHERSCAN_API_KEY="YourApiKeyToken"
On Windows (PowerShell):
setx ETHERSCAN_API_KEY "YourApiKeyToken"
Using a .env file (common for Node.js/Python projects):
ETHERSCAN_API_KEY=YourApiKeyToken
Then add .env to your .gitignore file so it’s never committed to version control.
Step 2: Load the Key in Your Application
Node.js example (using dotenv and axios):
require('dotenv').config();
const axios = require('axios');

const API_KEY = process.env.ETHERSCAN_API_KEY;
const walletAddress = '0xYourWalletAddressHere';

async function getWalletBalance() {
  const url = `https://api.etherscan.io/v2/api?chainid=1&module=account&action=balance&address=${walletAddress}&tag=latest&apikey=${API_KEY}`;
  const response = await axios.get(url);
  const balanceInWei = response.data.result;
  const balanceInEth = balanceInWei / 1e18;
  console.log(`Balance: ${balanceInEth} ETH`);
}

getWalletBalance();
Python example (using python-dotenv and requests):
import os
import requests
from dotenv import load_dotenv

load_dotenv()

API_KEY = os.getenv("ETHERSCAN_API_KEY")
wallet_address = "0xYourWalletAddressHere"

url = "https://api.etherscan.io/v2/api"
params = {
    "chainid": 1,
    "module": "account",
    "action": "balance",
    "address": wallet_address,
    "tag": "latest",
    "apikey": API_KEY,
}

response = requests.get(url, params=params)
data = response.json()
balance_eth = int(data["result"]) / 1e18
print(f"Balance: {balance_eth} ETH")
Step 3: Test the Configuration
Run your script or application and confirm you get a valid JSON response with "status": "1" and a result field populated with data. A "status": "0" response usually means an invalid key, malformed request, or rate limit issue — check the "message" field for details.
5. Common Wallet-Related API Calls
Once your key is configured, here are some of the most useful endpoints for wallet functionality:
| Purpose | Module/Action | Example Use |
|---|---|---|
| Get ETH balance | account / balance | Show wallet’s native token balance |
| Get balances for multiple addresses | account / balancemulti | Portfolio dashboards |
| Get normal transaction history | account / txlist | Transaction history view |
| Get internal transactions | account / txlistinternal | Contract-triggered transfers |
| Get ERC-20 token transfers | account / tokentx | Token activity feed |
| Get ERC-721/1155 transfers | account / tokennfttx / token1155tx | NFT activity feed |
| Get current gas prices | gastracker / gasoracle | Gas fee estimator |
| Get contract ABI | contract / getabi | Interact with smart contracts |
6. Security Best Practices
- Never expose your key in frontend/client-side code. If a wallet app runs in the browser, route Etherscan requests through your own backend server so the key stays server-side.
- Restrict key usage where possible. Use separate keys per app/environment so you can revoke one without disrupting others.
- Rotate keys periodically, especially if you suspect a leak (e.g., accidentally committed to a public GitHub repo).
- Monitor usage via the Etherscan API Keys dashboard to catch unexpected spikes that might indicate misuse.
- Respect rate limits. Implement request throttling or caching in your wallet app to avoid hitting the 5 calls/second cap, especially when polling balances or transaction history repeatedly.
- Handle errors gracefully. Build retry logic with backoff for rate-limit errors (
status: 0,message: "NOTOK") rather than hammering the API.
7. Troubleshooting Common Issues
| Problem | Likely Cause | Fix |
|---|---|---|
"Invalid API Key" | Key mistyped, expired, or not yet propagated | Double-check the key string; wait a few minutes after creation |
"Max rate limit reached" | Too many requests per second | Add delay/throttling between calls |
Empty result array | Wrong chain ID or address with no activity | Confirm chainid matches the network you intend to query |
403/CORS errors in browser | Client-side call exposing key | Proxy the request through a backend |
Configuring your API Key on AVXTO Wallet
Now it’s time to add your Etherscan key to AVXTO Wallet so it can load BNB data from Etherscan.
Wait for the banner to warn you that BNB chain could not be loaded. Find the add key link after the message:
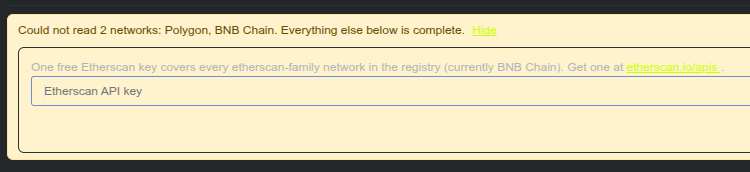
Enter the key and click Save. You should now be good to go!
Conclusion
Configuring an Etherscan API key is a quick but essential step for any wallet, dashboard, or tool that needs to read on-chain data. The process boils down to three steps: create an account and generate a key, store that key securely as an environment variable rather than hardcoding it, and use it in your API requests with the correct chain ID and endpoint parameters. Following the security practices above — especially keeping the key server-side and out of version control — will keep your application and its users safe as you build out wallet functionality on top of Etherscan’s data.